
To measure the sleeve of a jacket you own, lay it flat and measure from the top of the shoulder seam to the end of the cuff, following the sleeve’s outer line. When measuring your body for a size chart, first check the brand’s instructions. Some charts start at the shoulder; others start at the center back of the neck.
That starting point matters. A measurement taken from your neck includes part of your shoulder, so it will be longer than a measurement taken from the shoulder alone. Comparing the wrong numbers can make a jacket that fits look several inches too short on paper.
This guide explains both methods, how to compare your result with an online listing, and where different jacket sleeves should finish when you wear them. For a broader check of shoulders, chest and movement, see our leather jacket fit guide.
Check what the size chart actually measures
Before picking up a tape measure, look for the brand’s measurement diagram and check whether the chart lists body measurements or finished garment measurements. The words sleeve length alone do not tell you enough.
| Chart or listing | What you should measure | What to check |
| Body sleeve or arm length | Your body, using the specified starting point | Neck or shoulder start, arm position, and wrist endpoint |
| Garment sleeve length | A jacket that already fits you | Shoulder seam or neck start and the exact route to the cuff |
| Underarm sleeve length | The garment from its underarm seam to cuff | Do not compare this with an outer sleeve measurement |
For example, Columbia’s sleeve guide starts at the center back of the neck, while Charles Tyrwhitt’s suit jacket chart measures shoulder to cuff. Patagonia’s arm measurement instructions specify a bent elbow. These are different conventions, so follow the instructions attached to the jacket you want.
If you are unsure which measurement a Real Leather Garments product uses, contact our team to confirm the starting point and whether its size chart lists body or garment measurements. For a secondhand jacket, a photo showing the tape’s full route is especially helpful.
What you need before measuring
- A flexible sewing tape marked in inches or centimeters.
- A friend to help with body measurements, or a flat table for garment measurements.
- A thin shirt for measuring your body and your usual layers for checking the jacket’s fit.
- A note of the measurement, units, starting point, and left or right sleeve.
A rigid metal tape cannot follow the shoulder and elbow comfortably. Keep a soft tape close to the surface without pulling it tight or leaving loose loops.
How to measure sleeve length on your body
Use this method when the brand asks for body sleeve length or arm length. The steps below show the center back of neck method. Use the arm position and endpoint in the brand’s own diagram if they differ.
1. Stand naturally. Relax your shoulders and wear a thin top so the tape can follow your shape.
2. Find the center back of the base of your neck. Place the tape’s zero mark there, around the point where a shirt collar meets the back of your neck.
3. Guide the tape across the shoulder. Let it follow the shoulder’s slope to the outside of your upper arm.
4. Follow the arm through the elbow. For a guide that specifies a bent elbow, bend it as shown and take the tape along the outside of the arm, around the elbow, then toward the wrist.
5. Stop at the specified wrist point. Do not extend the tape onto your hand unless the brand explicitly uses that endpoint.
6. Record the result and repeat on the other arm. Measure each side twice with the same posture and tape route.
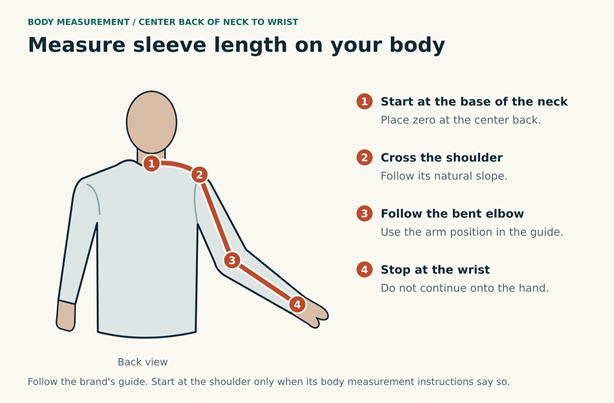
Body measurement from the center back of the neck. Follow the arm rather than taking a straight shortcut to the wrist.
When the brand starts at the shoulder
If the body guide specifies shoulder to wrist, start at the shoulder point indicated in its diagram and follow the requested route down the arm. Leave out the section from neck to shoulder. Do not estimate this by subtracting a fixed number of inches from another measurement.
Measuring yourself can be awkward because reaching for the tape changes your shoulder position. If you need an exact measurement for a custom jacket and cannot get help, a tailor is a better option than guessing.
How to measure the sleeve of a jacket you own
A jacket you already like is a useful reference when a seller supplies finished garment dimensions. Choose one with a similar cut: a fitted men’s leather blazer and an oversized bomber can have very different shoulder positions.
1. Lay the jacket face up on a flat surface. Smooth the sleeve alongside the body without stretching the fabric.
2. Find the top of the shoulder seam. This is the junction where the shoulder seam meets the sleeve at the armhole.
3. Place the tape at that junction. Follow the sleeve’s outer line toward the cuff. On a padded suit jacket, follow the small curve over the sleeve head before continuing down the sleeve.
4. Finish at the cuff’s outer edge. Include the cuff when the seller’s diagram does; check whether ribbing, turnbacks, or detachable parts have separate instructions.
5. Measure the second sleeve and repeat. Keep the same starting point, tape route, and fabric position for both sides.
Proper Cloth’s jacket measuring guide illustrates the shoulder seam to cuff route and the curve over a padded sleeve head. If the retailer shows a different route, use that route for the comparison.
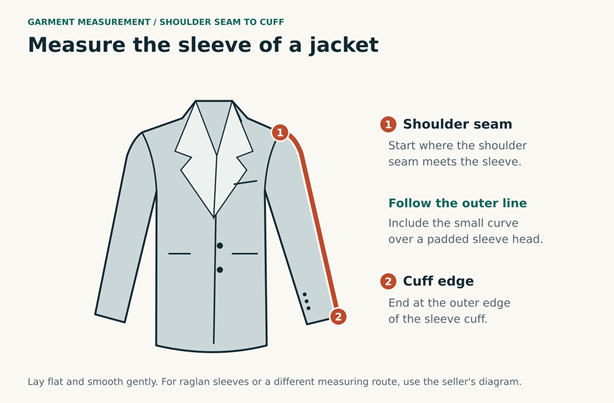
Finished garment measurement for a conventional sleeve. Start where the shoulder meets the sleeve, then follow the outer line to the cuff.
Raglan sleeves and dropped shoulders
A raglan sleeve joins the garment near the neck and has no conventional seam at the top of the shoulder. Use the brand’s specified route, which may start at the neck or use another marked point. Do not invent a shoulder seam starting point.
With a dropped shoulder, the seam sits farther down the arm. The sleeve section can measure shorter even though the whole garment reaches the same wrist position. Compare jackets with similar shoulder construction, and check the shoulder width alongside the sleeve number.
How to compare your result with a jacket listing
Match three things before comparing numbers: the starting point, the tape route, and the type of measurement. A body measurement belongs with a body chart; a jacket measurement belongs with a garment chart.
Here is an illustrative comparison for two jackets measured shoulder seam to cuff using the same method:
| Jacket | Sleeve in inches | Sleeve in centimeters |
| Your reference jacket | 25.5 | 64.8 |
| Jacket in the listing | 26.0 | 66.0 |
| Difference | 0.5 longer | About 1.3 longer |
The listed sleeve is half an inch longer. That is a useful comparison when the shoulder construction is similar. A wider or dropped shoulder can change where the cuff lands, so the difference does not automatically translate into the same change on your wrist.
To convert inches to centimeters, multiply by 2.54. To convert centimeters to inches, divide by 2.54. Keep your original reading before applying any rounding instructions in the brand’s size guide.
Avoid adding a blanket allowance to your arm length. Standard size charts and custom order forms may handle extra room for movement differently. Submit the measurement requested and check the product’s fit notes.
Where should jacket sleeves end
For a classic suit jacket or blazer worn with a dress shirt, a common guide is to leave about one quarter to one half inch of shirt cuff visible with your arms resting at your sides. That is approximately 6 to 13 mm. Proper Cloth recommends this range as a starting point, with room for personal preference.
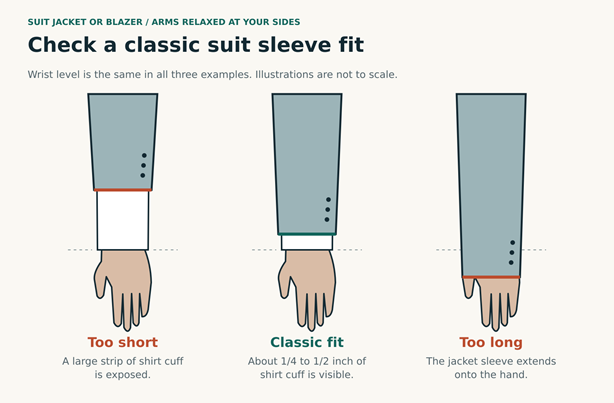
A classic suit sleeve comparison with arms at rest. The cuff guideline does not set the sleeve length for every type of outerwear.
Use the following practical checks for other styles, then compare them with the jacket’s intended design:
| Jacket style | Useful fit check |
| Suit jacket or blazer | Try it with a shirt whose cuffs already fit. Check visible cuff with arms relaxed. |
| Denim or leather jacket | Check wrist coverage at rest, then bend your elbows and reach forward. Cuffs should not interfere with your hands. |
| Leather bomber jackets with ribbed cuffs | The ribbing should sit comfortably at the wrists. Some fullness above it may be part of the design. |
| Winter or rain jacket | Try your usual layers and gloves. Check coverage while reaching; weather protection may require more length than a blazer. |
| Cropped or fashion sleeve | Judge it against the intended silhouette. A deliberately shorter sleeve does not need to meet a full length cuff guideline. |
These checks work for men’s and women’s jackets. The product’s cut and intended use determine the fit you need. Outdoor size guides also account for differences in activity and layering, as Columbia explains in its fit guidance. [6] For more on the waist, sleeves and room for layers, read our guide to how a bomber jacket should fit.
Check the fit before changing the sleeve length
Put on the layers you expect to wear, fasten the jacket as intended, and let it settle on your shoulders. Look at the cuffs with your arms relaxed. Then bend your elbows and reach forward, as you would when driving or reaching for a shelf.
Some cuff movement is normal. A sleeve that looks right at rest but pulls sharply up your arm during ordinary movement may also indicate a tight upper sleeve, restricted armhole, or poor shoulder fit. Check those areas before deciding that length is the only problem.
For a suit, confirm that the shirt cuff fits first. A shirt sleeve hanging onto your hand can distort the comparison. If one jacket cuff looks lower than the other, check that both shoulders sit evenly and record each side separately.
Common sleeve measuring mistakes
- Comparing a neck to wrist number with a shoulder to cuff number.
- Starting a garment measurement at the collar when the listing starts at the shoulder seam.
- Measuring under the arm when the diagram follows the outer sleeve.
- Pulling fabric tight, flattening padded sections aggressively, or leaving the tape loose.
- Choosing the whole jacket size from sleeve length alone without checking chest and shoulder fit.
- Adding extra inches for comfort before checking how the brand uses the measurement.
- Checking a blazer with the wrong shirt or a winter jacket without its usual layers.
Frequently asked questions
Do you measure jacket sleeve length from the neck or shoulder
Use the starting point in the brand’s diagram. Finished suit jacket measurements commonly start at the shoulder seam, while some body sleeve charts start at the center back of the neck. The two numbers are not interchangeable.
Should your arm be straight or bent
For body measurements, use the position shown by the brand. A bent elbow is specified in guides such as Patagonia’s. For an existing jacket, lay out the sleeve as instructed; you are measuring fabric rather than your arm.
Can you measure without a tape measure
A nonstretching ribbon or string can follow the same route. Mark the start and end, then lay it against a ruler. Repeat to check that it did not slip. A flexible tape is easier to use accurately.
Is there a standard sleeve length for a medium jacket
There is no single sleeve length that applies to every medium jacket. Brands, cuts, shoulder designs, and regular or tall options differ. Use the chart for the actual product rather than borrowing a number from another brand.
Can a tailor shorten or lengthen jacket sleeves
Often, but the available adjustment depends on the construction. Working buttonholes, ribbed cuffs, zippers, lining, and fabric inside the hem can limit what is possible. Ask a tailor to inspect the jacket before buying it on the assumption that its sleeves can be changed.
Before ordering, save your measurement together with its starting point and units. When browsing men’s leather jackets or women’s leather jackets, compare it with the same method in the product’s size chart, then check shoulder fit and the jacket’s intended use. That gives you a more useful basis for choosing than sleeve length alone.